
What causes them and how to fix them
This short technical update is written to explain how to deal with the common problem of sparking ignition leads - that is leads that spark along their length or at any place other than across the spark gap.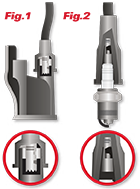
With the advent of higher voltage ignition systems, electronic and computerised controls as well as sophisticated testing equipment, ignition leads are taking on a whole new realm of importance. Proper installation and maintenance is now of critical importance if the leads are to function effectively on the engine. In the past, because voltage potential was relatively low and the degree of sophistication involved in spark control was low, lead installation was simple and caused few problems. Over the past few years this situation has changed significantly.
Very briefly, experience has shown that most problems occur from incorrect installation of leads. The most common problem area is the spark plug terminal connection to the spark plug nut. When installing the lead ensure the spark plug terminal inside the boot is firmly ‘snapped’ over the spark plug nut. This is particularly critical on some leads as the spark plugs are not always easily accessible. If the terminal is not connected firmly to the spark plug nut, then the voltage in the coil will rise significantly. (See Fig.2)
On modern ignition systems the voltage will rise many thousands of volts above normal. This is often observable on electronic analysis machines, which will indicate a lead or leads having excessive voltage (High Snap KV). The usual problem is not the leads themselves but poor connections to electrical apparatus at either end of the lead.
Things to check while installing leads and during maintenance
- Terminal depth from the end of the spark plug boot - should be about 20mm. A terminal located too deeply inside the boot will not contact the spark plug, thus causing a dramatic rise in voltage and consequently the leads to spark, particularly around the boot/cable junctions. A terminal located too close to the end of the boot will not be sufficiently insulated and will allow voltage to jump along spark plug porcelain and across to any metal parts.
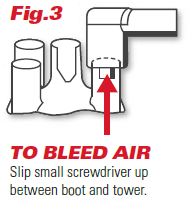
- R/A distributor and coil boots may need to be bled of air during installation, otherwise they will ‘pop off’. Simply slip a small screwdriver or other object inside the mouth of the boot during installation. This will allow air to escape and cause the boot to be held in place by the vacuum inside the socket.
- Modern leads should be treated as high voltage conductors. Clean the leads with metho or turps during routine maintenance. Some grease, particularly graphite based grease, and dirt will conduct electricity and cause surface tracking and breakdowns.
- Keep leads well away from all exhaust manifolds and other hot areas of the engine. Silicone lead is able to withstand 250°C+ temperatures. Exhaust manifolds can be much hotter than this so keep leads well clear.
- As far as possible keep leads well clear of all metal parts.
- Top Gun standard 5mm, 7mm & 8mm spiral wire (suppressed) leads should be approx. 6,000 Ohms (+/- 10%) per metre length. Test with a multimeter from terminal to terminal, and multiply resistance by